Showing posts with label Big Shot. Show all posts

Saturday, July 23, 2011

Wow, what a week! Part 6 - Saturday (is it over yet!?!?)

Well, Saturday is finally here, but I've got one more project that needs to get done and in the mail...my brother's birthday is next week, so I have to get his card finished (I'd actually started it earlier in the week, but I never could seem to get it done), and because it was Saturday, I had until 3:00pm to get it to the post office in time for it to go out with that day's mail.  Well, with all the other things I needed to get done on Saturday, I did it!

Front of Jake's card

Recipe:
Paper - Whisper White, Basic Black, Cherry Cobbler, Sahara Sand
Ink - Stazon, Basic Grey, Marina Mist, Cherry Cobbler, Daffodil Delight, Chocolate Chip
Stamps - King of the Grill (Retired)
Accessories - Texturez Plate (Retired), Big Shot, Oval Scallop Frame Bigz Die, Blender Pen, Dimensionals, Snail

I was in such a hurry to get it in the mail that I forgot to take a picture of the inside...I had made a really cute punch art grill in green since my brother has one of those green egg grills...hopefully he'll get the reference.  Oh well...guess it's time to get ready for a new week!

Friday, July 22, 2011

Wow, what a week...part 4 continued - Thursday

OK, so where were we...ah yes.....
I had to leave our mini convention to come home and finish designing a third card for my Thursday night class and to cut all the card stock that we would need.  It was an easy out, but I chose to use my convention card as one of my three cards (see previous post) for that night.
The second card I chose was a card we had done at a down line meeting back in April.  It was a card that Susan (my up line) had chosen for us to do as a farewell to the Nature Walk stamp set (not knowing for sure if they were going to bring it back in the new catalog or not...but they did, yeah!!).  It is a Z-card layout...
Second card for Thursday night stamp class

I hope it's not too hard to see, but the card stock colors are Rich Razzelberry, Old Olive and of course, Whisper White.  Rich Razzelberry was used to stamp the butterfly...first on the front "Z" flap and then on the inner whisper white panel.  The Rich Razzelberry and Old Olive pens were used to color in the branch image which was stamped and "stamped off" of the two panels.  The sentiments used were from Bring on the Cake and Happiest Birthday Wishes.  A little bit of Pear Pizzazz seam binding to finish it off and they were good to go!

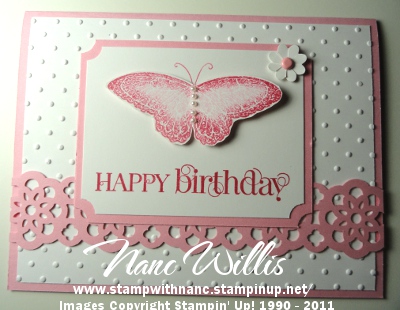
The third card...that was the toughest...I'd just received the ribbon lace border punch, and I really wanted to use it!  After searching several websites and blogs, I found one on Stamp with Amy's blog that I thought I might be able to work with (here's her card)...hers didn't use the border punch, it used ribbon, but pretty much everything else was the same, so yes, I CASE'd it (when you're pressed for time...sometimes, you've just got to go with it).  Here is the front of the card...

Thursday night stamp class - card#3 front panel

And here is what I came up with for the inside...
Thursday night stamp class - card#3 inner panel

It really turned out to be a beautiful card using Pretty in Pink and Whisper White.  Ink colors used were Pretty in Pink and Rose Red.  The stamp sets used were Curly Cute, Word Play, and Strength & Hope.  That last set is from the Summer mini, and for each set purchased, Stampin' Up! is donating $2.00 to the Breast Cancer Research Fund...it doesn't matter if you purchase the wood mount, the clear mount or the digital version...their donation is the same.  Anyway, back to the card...accessories used to make this card are, Big Shot, Polka Dot Embossing Folder, Sponge Dauber, Basic Pearls, Pretty in Pink Brads, Glue Dots, Two-Way Glue, 1/16" Circle Punch, Flower Punch from Punch Trio, Ticket Corner Punch, and the Lace Ribbon Border Punch. 
When all was said and done, my students in the Thursday night class loved all of their cards, so it was all worth it!

Sunday, July 17, 2011

Wow, what a week....Part 3 - Wednesday

Wednesday

Wednesday morning, I got up and put the finishing touches on a card I was working on for my niece.  It used a stamp set that was retired, but when you're doing cards for family members, it's good to break out some oldie, but goodie sets...
Natalie's Birthday Card

I know the set isn't that old (it's from this past sale-a-bration), but I think it's going to be one that I get quite a bit of use out of.

Recipe:
Paper - Melon Mambo, Pumpkin Pie, Pear Pizazz, Daffodil Delight, Whisper White
Ink - Melon Mambo, Pear Pizazz, Pumpkin Pie
Stamps - Punch Bunch (Retired), Create A Cupcake, Bring On the Cake
Accessories - Big Shot, Polka Dot EF, Pear Pizazz Seam Binding, Basic Rhinestones, Glue Dots, Dimensionals, Scallop Square Punch, Scallop Border Punch, Cupcake Builder Punch, 1 3/4" Circle Punch

I was glad that I'd gotten up early because I had a bid day on Thursday, and I had so much to do to get ready for it.  Well, my head had other plans...I soon had a full blown migraine, and I wasn't getting anything done.  It wasn't until later that evening that I was able to get anything done.  I was once again up until almost three am trying to prepare for the next day. 

I hope you'll tune into my next post to see what the fuss was all about....

Wow, what a week....Part 2 - Tuesday

TUESDAY

On Tuesday morning, I had to head out for my Tuesday class in Lake Alfred. We used to do three cards each week, but my ladies kept saying that they loved their cards so much; they didn't want to give them away. After discussing it, it was decided that they would start making only two new cards each week, but they would be making two of each of them (for a total of four). They also decided that they wanted to get a head start on their Christmas cards this year, so each week; one of the cards is a Christmas card. Last week, they told me that a few of them were in need of anniversary cards, so if I could come up with something, they would appreciate it. When I was trying to figure out what cards they were going to make this week, at first I thought they'd do this design for their anniversary card...
Anniversary card 1st Attempt

I cased this from a card I'd seen on Lee Ann Greff's web site several months ago, but it just wasn't doing it for me. Then I decided on this design...
Anniversary Card 2nd Attempt

Just by changing it a little and adding a black backing, I couldn't believe what a difference it made. Here is the inside of the card...
Anniversary Card Inside

I decided to pre-make the flower centers since crystal effects takes a while to set up, but I did demonstrate how they were made.

Recipe:
Paper - Basic Black, Whisper White, Marina Mist
Ink - Basic Black, Marina Mist
Stamps - Vintage Vogue, A Word for You, Something to Celebrate, Well Scripted (Retired), Very Vintage Jumbo Wheel
Accessories - 5/8" Black Satin Ribbon, Clear Blocks, Crystal Effects, Glass Beads (Retired), Big Shot, Final Press EF, Scallop Border Punch, 1/2" Circle Punch, Small Circle Punch from Punch Trio, Glue Dots, Dimesionals, Snail

For the Christmas card, I guess since the card I'd made for my SIL (from Monday) used retired colors, I guess I was still in the mood to use them so we ended up doing this card...
Tuesday Class Christmas Card

When I first started getting into Stampin' Up!, I think I saw this card on Splitcoast Stampers (sorry, I don't know who to give credit to...if you know, please let me know and I'll be happy to acknowledge their talents), and I've saved it all this time as a card I really liked. The colors aren't your traditional colors for the holidays, but I thought it was very pretty. Here's a look at what we did with the inside of the card...
Tuesday Card Class Inside of Christmas Card

Recipe:
Paper - Rich Razzelberry, Old Olive, Whisper White, Cottage Wall DSP (Retired)
Ink - Old Olive, Rich Razzelberry, Orchid Opulence (Retired), Versa Mark
Stamps - Tree Trimmings, Teeny Tiny Wishes, Many Merry Messages
Accessories - Big Shot, Petals A Plenty EF, Stamp-a-ma-jig, Iridescent Ice (Retired), Scallop Oval Punch, Medium Oval Punch, Heat Gun

When I got home that afternoon, I started on a card for my niece...I'll show you that card in my next post....Wednesday.....

Wow, what a week! Part 1 - Monday

This past week was a blur.  Every day was loaded with things to do and accomplish, and I couldn't wait for Saturday to get here.  It probably won't seem like a lot, but check out what I had to do this past week:

MONDAY

On Monday, I had to get a birthday card made and into the mail for my SIL (sister-in-law).  I was racking my brain for a card that she might like, and this is what I finally came up with...

Debbie's Birthday Card

She loves purple, so I broke into my retired stash and used the Bliss stamp set from this past Sale-a-bration as well as the retired ink color Orchid Opulence.  I hope she likes it.
Then I had to figure out what cards my Tuesday class would be making as well as prepare all the supplies for it.  So guess who was up until 2:30 am...?!?!

Recipe:
Paper - Orchid Opulence, Whisper White
Ink - Orchid Opulence
Stamps - Bliss
Accessories - Big Shot, Wallpaper EF, Embossing Powder, Basic Rhinestones, Stamping Sponge, 1'4" Orchid Opulence Grosgrain Ribbon, Dimensionals

Look for the next post for what I needed to accomplish on Tuesday....

Wednesday, July 06, 2011

Here we go....

Well, I've been wanting to take this leap for a while now, so today I'm jumping in with both feet...my own blog...can you believe it?!?  I've decided that if I'm going to pursue my love of making cards and related items seriously, this is an avenue I have at my disposal to express myself as I learn and grow.  I hope you'll join me on my journey into the adventures of card making...here we go...

I've started teaching classes which I thoroughly enjoy!  Here is one of the cards we've recently made in class.

Isn't it beautiful?!?  I know it's only July and this is a Christmas card, but the participants in this class wanted to get a head start on their Christmas cards for this year, so one of the cards we do each week is a Christmas card.


Card Details
Paper - Whisper White & Cherry Cobbler
Stamps - Christmas Greetings
Ink - Cherry Cobbler
Accessories - Big Shot, Northern Flurry Embossing Folder, Basic Rhinestones & Snail Adhesive
All products used are Stampin' Up!

I'd love to hear your comments, so drop me a line and let me know what you think, okay?